An eSIM, short for “Embedded Subscriber Identity Module”, is a chip that is integrated directly into a mobile device. Unlike traditional SIM cards, which must be physically inserted into the device, an eSIM can be remotely programmed with a SIM profile through an internet connection. This technology eliminates the necessity of physically inserting a SIM card into the phone or device in order to connect it to a mobile network.
I’m currently using Dialog as my mobile carrier and recently, I encountered a challenge when my workplace provided me with an additional SIM card since my smartphone lacked the capacity for two physical SIM modules but supported one physical SIM and an eSIM. As a solution, I decided to switch to an eSIM. In this article, I will first describe the steps that worked for me to convert my existing prepaid number to an eSIM. Next, I will describe the methods that didn’t work and my related experience in converting to an eSIM.
Prerequisites and Warnings:
- A compatible handset (Dialog supports a large number of newer handsets from Apple [Including iPads], Google, Huawei, Samsung, and Sony). This support could vary depending on your carrier, handset model, mobile OS, and handset status (locked, unlocked, etc).
- You could lose connectivity for a brief period. Therefore, choose a non-busy time of the day for this.
- You won’t be able to reverse the process online. Please carefully read the Disclaimer section at the bottom of this article.
Method of converting to an eSIM.
As of October 2023, the process of converting to an eSIM with Dialog in Sri Lanka is remarkably straightforward and accessible to individuals with even a basic understanding of technology. However, please be aware that there are inherent risks involved, and I strongly advise you to refer to the Disclaimer section before proceeding.
- First, log into Dialog’s Selfcare Application (i.e. My Dialog App).
2. There, select your mobile connection. Under the mobile connection, scroll down to the bottom of the page until you come to the ‘Other services’ section, which includes an option for eSIM (Figure 2). Next, tap on this ‘eSIM’ button.

3. Then, you would be directed to Dialog’s eSIM page which includes information about what is an eSIM. There, should be a section to enter your mobile number and the device you are using. Please note that if the device you are using is not within the provided list, it could either be it may not be compatible with Dialog or the site is yet to update. In either case, it is better not to proceed from here onwards.

Currently, I’m using a Google Pixel 6a with the latest Android 14. I’ve tried the same with Android 13 on the Pixel 6a and is compatible with the Dialog eSIM. Once you enter this, you will be prompted to enter OTP, which will be sent to your device. Next, it would prompt you for an email and ask for another OTP for email verification.
4. Once you have completed the above steps, you will be greeted with the following (Figure 4) that shows the eSIM Request is Successful.

5. As the next step, A QR code will be sent to your email. Open the attachment from the email and Scan the QR code.
Since the content of the email would be confidential, I would not include any screenshots. Once you have scanned the QR code from your camera app, it will directly open the eSIM installation-related wizard of the phone.
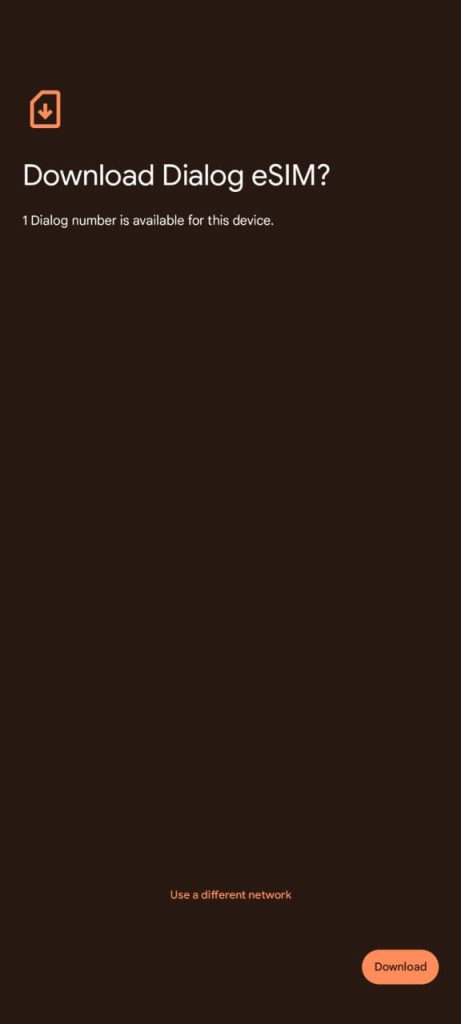
6. First, it would prompt you to download the app. Tap on the Download Button (Figure 4).

7. Once, the download is completed, it will ask to install the profile. Then, once the profile is downloaded, from your device’s settings page, there will be a new profile available. Make this profile active. In my case, I had to enable the toggle for Use SIM (Figure 5). In Android devices to view SIM information, you may go to Settings > Network & Internet > SIMs > Then select the new SIM profile.
Due to the diversity of Android, the exact steps you need to follow could slightly vary.

8. That’s it!
Removal of the eSIM.
In case you want to remove the eSIM. First, you have to uncheck the toggle shown in Figure 6 (Use SIM). It would prompt to change the default SIM to the remaining physical SIM, and then, there would be an option to Erase SIM (Figure 7).

Additional Notes:
The following includes my experience and additional details.
- After a few minutes, my existing SIM became unprovisioned.
- The status of the new SIM was unprovisioned (Figure 7).

As you can understand, it was such a wonderful feeling to realize that you don’t have a working connection and so it could be justifiable to get panicked. After around an hour of trying different things, I called Customer Care, and the Customer Care person also reiterated that the eSIM was yet to be provisioned and it would be better to wait for at least 3 hours and then rescan the QR code.
- What worked for me was to wait around 3 hours to get the eSIM to provision and then rescan the QR code and set up the SIM profile again for the eSIM to properly work.
What didn’t work?
- 2, 3 months back I tried the same steps, but, then the Dialog Selfcare redirected me to an error page. Since it is now working, that means, whatever the issue that existed is now sorted.
- I tried these steps around 10 p.m. on an evening. This didn’t work. Even the old SIM didn’t get unprovisioned, until my next attempt, this time on a morning. Therefore, better to try this during a working day within working hours. That way, even if you have any issues, you will be able to contact the customer care hotline (1777) and get the issues sorted.
- It took some time for the SIM to get provisioned. Therefore, please wait at least 3 hours, rescan the QR, and set up the eSIM profile, before trying to contact Customer Care.
I thought it would be better to include my experience with Other Local Operator’s eSIM conversion. According to this operator’s customer care, they have eSIM enabled but only for post-paid SIMs.
References:
Disclaimer:
The information provided in this article is intended for informational purposes only.
Converting a physical SIM card to an eSIM may vary depending on your mobile carrier, device model, and the software versions available at the time of conversion. It is essential to consult with your mobile carrier and refer to the official documentation provided by your device manufacturer before attempting to convert your SIM card to an eSIM. You won’t be able to reverse the process of converting an eSIM to a physical SIM online. For that find the nearest store of your network provider.The author and publisher of this article are not responsible for any issues, disruptions, or damages that may occur as a result of attempting to convert a SIM card to an eSIM. Users are advised to proceed cautiously and at their own risk when performing any such conversion. Always back up your data and contacts before making changes to your mobile device’s settings.

E sim
I need to make sim to esim